DIY Bidet Installation: A Complete 2026 How-To Guide
Thinking about a bidet? Most DIY guides overlook a critical backflow prevention step, risking costly plumbing issues. You can save $100-$300 yearly on toilet paper and upgrade hygiene in under 30 minutes, but only if you know the simple trick to avoid a $250 leak repair. Don't make this common mistake.
Why a Bidet in Your American Home? (And What You'll Save)
Imagine your next grocery run, but without buying toilet paper. For many Americans, that's a reality with a bidet, an upgrade that's becoming more common across the country. A bidet offers superior hygiene and can significantly cut down on your monthly household spending.
Most households spend between $100 to $300 annually on toilet paper. Switching to a bidet can virtually eliminate this recurring cost. This simple change adds up quickly, freeing up hundreds of dollars each year for other needs, like that weekend trip to the Grand Canyon.
Beyond the savings, bidets provide a cleaner, fresher feeling than toilet paper alone. It's like taking a shower versus just wiping with a towel. Plus, it's a more eco-friendly choice, reducing your household's paper consumption and overall environmental footprint.
Choosing Your Bidet: Attachment vs. Seat (2026 Options)
Before you grab your wrench, you need to pick the right bidet for your needs and budget. The two most popular DIY-friendly options are bidet attachments and bidet toilet seats. Each has its own advantages and installation complexity.
Bidet attachments are the simplest and most affordable. They typically consist of a nozzle unit that mounts under your existing toilet seat, connecting to your toilet's cold water supply. They offer basic washing functions and are perfect for beginners.
Bidet toilet seats, on the other hand, replace your entire toilet seat. These often come with advanced features like warm water, heated seats, air dryers, and even remote controls. While more expensive, they offer a spa-like experience and are still manageable for a DIY install.
Here’s a quick comparison of what you can expect from each type in 2026:
| Feature | Bidet Attachment | Bidet Toilet Seat |
|---|---|---|
| Price Range | $30 - $100 | $150 - $600 |
| Installation | Very Easy (15-30 minutes) | Moderate (30-60 minutes) |
| Water Temp | Cold water only (most models) | Warm water (requires electrical) |
| Power Needed | No | Yes (for heated features) |
| Key Features | Basic wash, adjustable pressure | Heated seat, air dry, remote, varied wash modes |
| Popular Brands | Tushy, Lux Bidet | Bio Bidet, Toto, Brondell |
Consider your comfort level with plumbing and electrical work when making your choice. An attachment is a great first step, while a bidet seat offers more luxury.
Gathering Your Toolkit: What You'll Actually Need
You likely have most of the necessary tools already tucked away in your garage or under the sink. This guide focuses on standard toilet models found in most American homes. You won't need specialized plumbing knowledge, just a few common items.
Before you start, make sure you have these essentials. You can pick up anything you're missing at your local Home Depot or Lowe's for under $50.
- Adjustable Wrench: For tightening connections. A crescent wrench or channel locks also work.
- Screwdriver (Phillips or Flathead): To remove your existing toilet seat bolts.
- Small Bucket or Towel: To catch any drips when disconnecting water lines.
- Pliers: Helpful for stubborn nuts.
- Flashlight or Headlamp: To see clearly in tight spaces behind the toilet.
- Thread Seal Tape (Teflon Tape): Essential for preventing leaks on threaded connections. This is often overlooked but critical.
- Your New Bidet: Of course! Make sure all parts are included and undamaged.
Some bidet kits come with a small wrench, but a sturdy adjustable wrench provides better grip. Having thread seal tape on hand is a non-negotiable step for a leak-free installation.
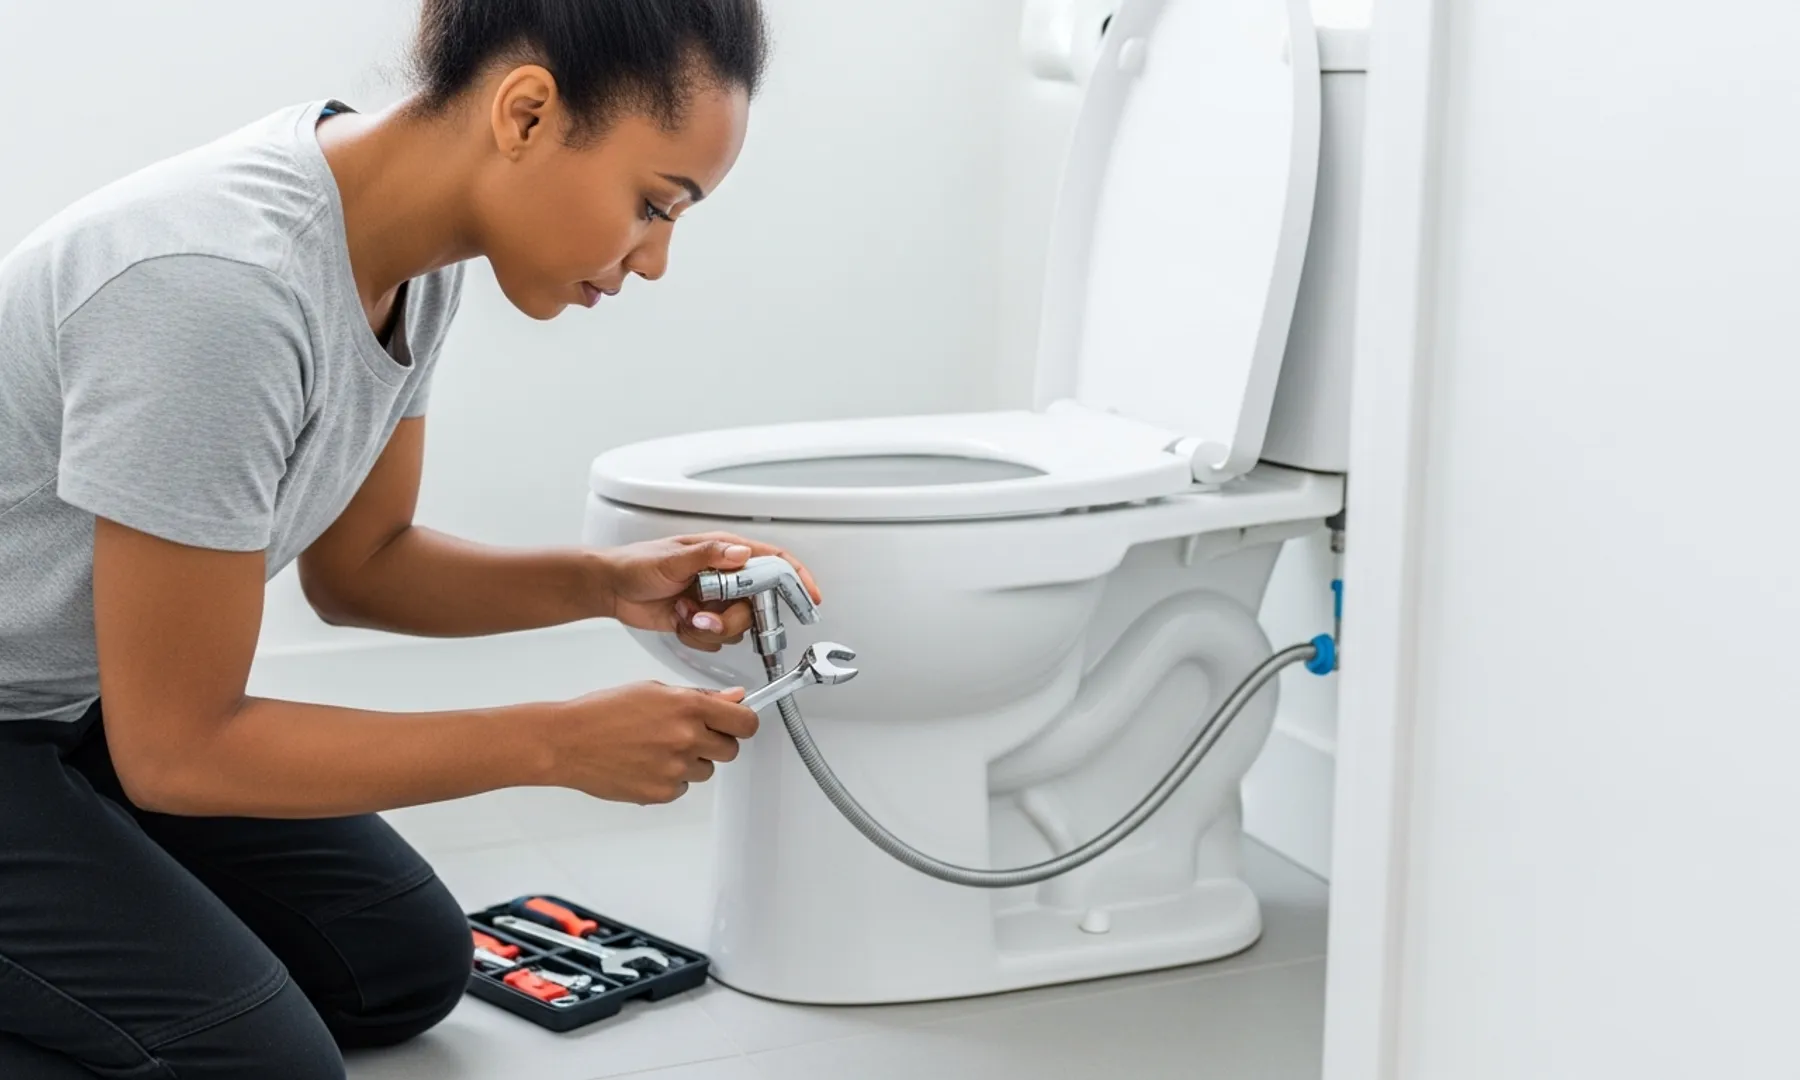
Step-by-Step Installation: Bidet Attachment (The 30-Minute Upgrade)
Ready to transform your toilet? Installing a bidet attachment is surprisingly quick and straightforward. Most people can complete this upgrade in under 30 minutes, even if they've never touched a wrench before. Follow these steps carefully to ensure a smooth, leak-free experience.
- Turn Off the Water Supply: Locate the small valve on the wall behind your toilet, usually to the left. Turn it clockwise until the water flow stops completely. Flush the toilet to drain the tank and bowl as much as possible.
- Remove the Toilet Seat: Lift the plastic caps at the back of your toilet seat to expose the mounting bolts. Unscrew these bolts with a screwdriver. You might need to hold a nut on the underside of the bowl to keep it from spinning. Set the seat aside.
- Install the Bidet Attachment: Place the bidet attachment's mounting plate onto the toilet bowl's holes, underneath where your seat usually sits. Some models slide under the existing seat bolts. Reattach your toilet seat over the bidet plate, aligning the holes, and tighten the bolts firmly but don't overtighten.
- Disconnect the Toilet Supply Line: Place your small bucket or towel under the toilet's water tank connection. Unscrew the flexible water supply line from the bottom of your toilet tank. A little water might drip out, which is normal.
- Install the T-Adapter: Wrap thread seal tape (Teflon tape) clockwise around the threads of the bidet's T-adapter. Connect the T-adapter to the bottom of your toilet tank where you just removed the supply line. Hand-tighten first, then use your adjustable wrench for a snug fit. Do not overtighten, as this can crack plastic parts.
- Reconnect Water Lines: Attach your original flexible water supply line to the bottom of the T-adapter. Wrap thread seal tape on the threads and tighten with your wrench. Then, connect the bidet's flexible hose to the side of the T-adapter and to the bidet attachment itself. Again, use thread seal tape and tighten carefully.
- Restore Water and Check for Leaks: Slowly turn the water supply valve back on, counter-clockwise. Listen for any hissing sounds and visually inspect all connections for drips. Flush the toilet a few times to ensure the tank refills correctly and the bidet functions. If you see a drip, turn off the water, tighten the connection a quarter turn, and check again.
Upgrading to a Bidet Seat: A Slightly Deeper Dive
Installing a bidet seat follows many of the same principles as an attachment but often involves a few extra steps, particularly if it's a heated model. These typically require an electrical outlet nearby. If you don't have one, you'll need an electrician, which means this might not be a pure DIY job.
- Prepare as Before: Turn off the water supply, flush the toilet, and remove your old toilet seat. Clean the toilet bowl area thoroughly.
- Install the Mounting Plate: Bidet seats usually come with a specialized mounting plate. Secure this plate to the toilet bowl using the provided bolts and washers. Ensure it's centered and stable.
- Slide on the Bidet Seat: Align the bidet seat with the mounting plate and slide it into place until it clicks or locks. This connection is usually tool-free.
- Connect the Water Supply: Disconnect the toilet's flexible water supply line from the fill valve, just as with an attachment. Install the bidet seat's T-adapter, applying thread seal tape to all connections. Reattach the original supply line to the T-adapter, and then connect the bidet seat's flexible hose from the T-adapter to the bidet itself. Tighten all connections carefully with a wrench.
- Connect Electrical Power (If Applicable): If your bidet seat has heated water, a heated seat, or an air dryer, it will have a power cord. Plug this into a grounded GFCI (Ground Fault Circuit Interrupter) outlet. If there isn't one within reach, do not use an extension cord; consult an electrician to install a proper outlet. This is a crucial safety step.
- Test and Adjust: Slowly turn the water supply back on. Check all connections for leaks. Plug in the bidet seat (if applicable) and test its various functions according to the manufacturer's instructions. Adjust water pressure and temperature settings to your preference. If you encounter any electrical issues, unplug immediately and call a professional.
Crucial Checks: Avoiding Leaks and Backflow Mishaps
A successful bidet installation isn't just about getting water flowing; it's about ensuring it stays where it belongs and remains clean. The biggest risks for DIYers are leaks and potential backflow contamination. Ignoring these can lead to costly repairs or even health concerns.
After turning the water back on, spend a few minutes inspecting every single connection point. Use a paper towel to gently touch each joint; even a tiny amount of moisture indicates a slow leak that needs immediate attention. If you find a leak, turn off the water, loosen the connection, apply more thread seal tape, and retighten.
Backflow prevention is vital. Most modern bidets come with a built-in backflow prevention device, often a vacuum breaker, to stop contaminated toilet water from siphoning back into your clean water supply. Always verify that your chosen bidet model includes this feature. If it doesn't, or if you're unsure, consider a different model or consult a plumber. This isn't a step to skip, especially in cities like Los Angeles or Dallas where local codes are strict.
Maintaining Your Bidet for Years to Come
Once installed, a bidet requires minimal upkeep, but a little regular maintenance ensures it operates efficiently and hygienically for years. Think of it like keeping your kitchen sink clean – a little effort goes a long way.
Regular Cleaning: Use a mild, non-abrasive cleaner and a soft cloth to wipe down the bidet nozzle and seat surfaces. Many bidet seats have a self-cleaning nozzle feature; run it regularly. Avoid harsh chemicals or abrasive brushes, which can damage the bidet's finish or internal components.
Nozzle Maintenance: Periodically pull out or extend the nozzle (if your model allows) and gently clean any mineral deposits or debris with a soft brush, like an old toothbrush. In areas with hard water, mineral buildup can affect spray patterns.
Filter Replacement: Some bidet models, particularly those with warm water features, include a small water filter. Check your bidet's manual for recommended replacement schedules, usually every 6-12 months. Replacement filters typically cost $10-$20 and are easy to swap out.
Winterizing (if applicable): If your bidet is in an unheated space that might freeze, like a cabin in Colorado, you'll need to drain it to prevent damage. Follow the manufacturer's instructions for winterization, which usually involves disconnecting the water supply and purging water from the unit.
When to Call a Pro: Knowing Your Limits
While most bidet attachments and seats are designed for DIY installation, there are situations where calling a licensed plumber is the smart, safe, and often legally required choice. Recognizing these limits can save you from bigger headaches and expenses down the road.
If your toilet's water supply valve is old, corroded, or won't turn off completely, stop immediately. Forcing it can cause a burst pipe and significant water damage. A plumber can replace the valve safely.
If your bidet seat requires an electrical outlet and you don't have a grounded GFCI outlet nearby, do not attempt to install one yourself. Electrical work should always be handled by a qualified electrician to prevent fire hazards or electrocution. Also, if your bidet comes with complex instructions that you don't understand, or if you encounter persistent leaks after troubleshooting, a professional can diagnose and fix the issue efficiently. Expect a plumbing service call to range from $150 to $250, but it's worth it for peace of mind.
Bidet Brands Americans Trust (2026 Picks)
As you consider your options, it helps to know which brands consistently deliver quality and reliable performance in the US market. These companies offer a range of products from simple attachments to feature-rich seats, ensuring there's something for every budget and preference.
Tushy: Known for its minimalist design and easy-to-install bidet attachments. The Tushy Classic 3.0 remains a popular choice for its affordability and effectiveness, often retailing for around $99.
Bio Bidet: A leader in bidet toilet seats, offering advanced features. The Bio Bidet BB-2000 Bliss is a high-end option providing warm water, air drying, and a remote control, typically priced around $600-$700.
Toto: A premium Japanese brand with a strong presence in the US, famous for its Washlet series. Models like the Toto Washlet C2 blend quality with essential features like warm water and an air dryer, usually starting around $400.
Brondell: Offers a wide range of bidet attachments and seats. The Brondell Swash 1400 is a well-regarded bidet seat known for its dual stainless steel nozzles and user-friendly controls, often found for $500-$650. Many of these brands are available at major retailers like Amazon, Home Depot, and Lowe's, making them easily accessible.
Ready for a Cleaner Home? Your Next Steps
Installing a bidet yourself is a rewarding project that pays dividends in hygiene, comfort, and cost savings. By following these steps and understanding the nuances between attachments and seats, you can confidently upgrade your bathroom without needing a professional.
Remember to prioritize safety by turning off the water, using thread seal tape, and checking for leaks. If your bidet requires electricity, ensure you have a proper GFCI outlet. Don't let the idea of plumbing deter you; this is one DIY project that truly delivers long-term benefits.
Start by comparing bidet models and prices online to find the perfect fit for your home. You'll be enjoying a fresher, cleaner bathroom experience in no time.